Sunday, February 13, 2011

Hermle Offers C 50 U Machining Center


The C 50 U machining center from Hermle is designed to meet the increasing need for machines capable of simultaneous 5-axis machining of large, complex parts in high-strength alloys. The C 50 U is suitable for industries such as aerospace, automotive, moldmaking and valve making.

With axis travels of 1,000, 1,100 and 750 mm in the X, Y, Z axes, respectively, the standard version can accommodate work pieces of up to 2,000 kg with a maximum part diameter of 1,000 mm and a height up to 810 mm.

"Incorporating Hermle's patented modified gantry design, the C 50 U is both rugged and compact and requires no special foundation," said a company spokesperson. Spindle speed is 18,000 RPM standard (9,000/12,000 RPM optional). The tool changer is incorporated in the machine base and is available with 60 or 42 pockets. Chip-to-chip time is approximately 7 seconds.

The C 50 U Dynamic is available with a Heidenhain iTNC 530 control or a Siemens S840D SL unit.

Ease of loading is facilitated by a crane-loading feature and a door opening up to 1,250 mm. Work platforms along the entire machine front and at the magazine load station are ergonomically designed to minimize operator fatigue.

In addition to a standard tilting table, the C 50 U is available with an NC swiveling rotary table, featuring a clamping surface of up to ¯ 700 mm, or the optional NC swiveling rotary table with a clamping surface of ¯ 1,150 mm x 900 mm. Both tables utilize an integrated torque motor (C-axis) and a tandem drive motor (A-axis). The RPM of the A-axis is 20 RPMs and the C-axis rotates at 30 RPMs. The A-axis is designed to increase flexibility by offering a swivel range extending +30/-115 degrees, and the C-axis rotates a full 360 degrees.

An optional pallet changing system is available in multiple sizes and configurations for partial to fully automated operation. Pallet change systems feature generously dimensioned doors for easy and ergonomic access to the work area and set-up station, the company said.

Hermle Machine President Robert Komljenovic said, "Hermle's entire C series was designed to offer our traditional high precision with increased production capability up to and including full automation. The C 50 U Dynamic, available with a wide range of options and configurations, has made this possible for manufacturers of large parts in many industries."

The C 50 U is also available in a C 50 U MT dynamic configuration. With axis travels of 1,000 mm, 1,100 mm and 750 mm in the X, Y and Z axes and a maximum table load of 1,000 kg, the C 50 U MT features speeds of up to 20 RPM in the swiveling A-axis and 500 RPM in the rotary C-axis. Equipped with Hermle's slender spindle design for deep-pocket milling and turning, it also features a manually adjustable balancing system integrated into the table to prevent damage from inertial torque.

A new laser-based tool measuring and breakage monitoring system assures the integrity of both milling and turning tools, the company said.

Other features include the elimination of chip collection on the table, torsion prevention through tandem drives and high-torque motors in the rotary axis.

"The single greatest advantage of the MT feature is the ability to perform multiple operations in full 5-axis mode in a single clamping," said Komljenovic. "Larger parts are especially susceptible to errors in positioning when being moved from one machine to another. In complex high-value parts, this can result in significant financial loss. By combining the machining and the turning processes, we can offer our customers what is in reality an automated process station with the highest precision capability."

New CoroMill 325 ensures faster and more accurate thread whirling

The growing use of special thread forms for medical bone screws, implants and other micro components creates an increased need for techniques that produce threads fast and at high tolerances.

On October 1st Sandvik Coromant introduces the new CoroMill 325 thread whirling inserts and holders.

Thread whirling is a fast and accurate way to thread long, slender components in difficult to machine materials. By combining the speed of thread whirling with the rigidity of a sliding head machine, complete threads are produced accurately and in a single pass, without the need for special supports. 


CoroMill 325  thread whirling inserts and holders  can produce a wide range of high precision screws and implants from rough stock at high speeds and fit a large number of sliding head machine types. All without the need for a dedicated thread whirling machine.

Using this technique, a number of advantages can be gained over traditional single-point threading including increased productivity , faster set up times , no extra costs for finishing treatment, superior chip control and increased tool life over conventional tools.


Saturday, February 5, 2011

Steve Fornelius' Indicator Attachment


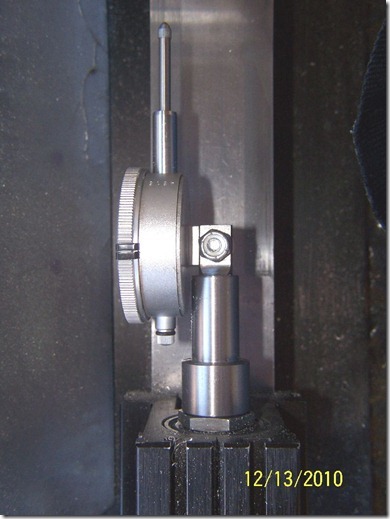
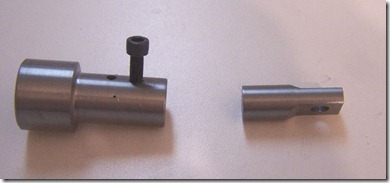
“Here's what I made so that I could mount my dial indicator on the headstock arbor. Using this I'm able to get the variance of the milling attachment to less than .001 easily.
The unit is simple to make: Use a blank arbor, drill halfway through with cut down 1/2 inch drill (available at any hardware store. I drilled and tapped a 10-32 hole to take a SHCS. Since you're not turning on the lathe with this in place it isn't important how long the screw is.
For the holder itself, II used a piece of 1/2" 12L14 stock about 3 inches long. I used a 3/8" mill and the milling vice to cut down both sides so the finished size is about 1/4" thick. The reason for this is to allow the dial indicator plunger and dial to clear the holder.I drilled a 1/4" hole in the end.
To use this, mount the dial indicator with 1/4-20 bolt and nut, then slide the holder into the adapter.and tighten down the set screw. Screw the adapter onto the headstock arbor. Put the work piece into the milling vice and move the cross slide down so that the indicator goes around at least once. Crank the cross slide until one side of the work piece is indicating and gently tighten the rear milling adapter screw. Crank to the other side of the work piece and note the difference in readings.
Then I simple twist the milling attachment so that the indicator reads 1/2 the difference. I keep moving the cross slide back and forth, adjusting out the variance until there is no movement of the indicator needle. Then I tighten down both milling attachment screws evenly and recheck the variance. The first couple of times you will probably need to loosen the screws and adjust again, but it works better than any other way I've tried. I can get a repeatable 0.0005 cut on the milled pieces when cutting grooves.”
sfornl06sfornl07sfornl08sfornl09sfornl10

Peter Zicha's Taig Mill and Projects


“This is my Taig CNC mill as of today.”
pzich21pzich22
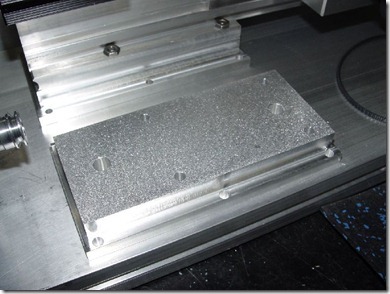
”I am starting to do the manual electric drive & CNC drive retro fit on both units machining parts . I made some 3/4 inch base risers for both units . one mounted and the other waiting for its partner in the mail . “
pzich23pzich24pzich25

Guy Zattau's Taig CNC Mill Limit Switches


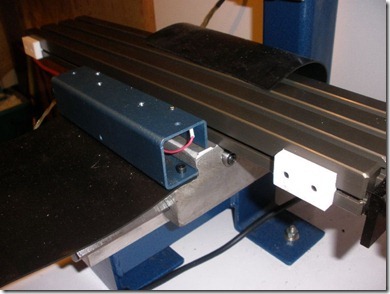
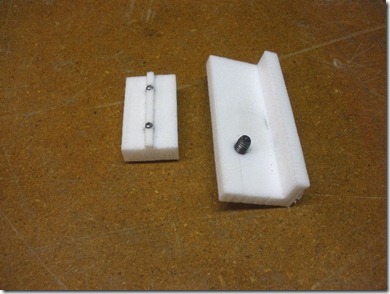
“Here's some pics of the setup and the limit switch arrangement with no holes drilled in the mill. The white things are the trippers and the run close to the brackets that hold the micro switches.”
guy13guy14guy15guy16
Here are the pics of the mill limit switch brackets before being installed. #'s 1, 2, 3 are the X axis that mounts on using the holes for the rubber way protector. It mounts using the two end holes with access holes thru the top for an allen wrench. The rubber is sandwiched in between. The slot is 3/8" by 1/2" and the relief for the post is 3/8". Material is 1 3/4" x 1 3/4" x 6 1/2". I used .080" but it's a little too thick and makes it hard to get the trip levers to actuate the micro switches.
guy05guy06guy07
“Z, made from 1" x 2" x 7 1/2" x .058". It is mounted using the holes tapped in the vertical axis post that mounts the power switch. Compression posts made of tubing sleeve the holes. Holes on the part next to the post are clearanced for the screw and the ones on the outside are just big enough for the tubes to pass and finish up flush.”
guy08
“the Y axis, made of 1" x 1" x 8" x .058" with two brackets. The brackets are 2" tall with a 1 5/8" foot, 1" x 1 1/2"
wide. The micro switches are approximately 1" x 3/4" x 1/2" and are mounted with 4-40 countersunk screw so the moving parts clear. The trip devices are made of a Teflon like material machined to ride on the moving component just off the surface of the brackets and tripping the actuator lever of the micro switch. It may be necessary to add a piece of shim stock to the lever to make them work, I used .030, glued to the lever with epoxy. “
guy09
Here are the pics of the microswitch trip pieces for the mill. The Z is a simple angle piece with a small ramp cut at the top so it can allow the Z axis to go to the limit. X was made as one piece, then cut in half. Drilled the holes first then milled away the sides to leave a ridge. The ridge centers the part and prevents the screws from marring the groove in the table. Cut the 4-40 allen screws to length so they don't bottom against the back of the nut retainer slot in the table. The Y is a piece of work and difficult to get off as it is necessary to remove the microswitch bracket first. The drawing that is enclosed with the copy's I sent you is probably more understandable that what I can write. It's a goofy design but the best I could come up with at the time. All the material I sent you is just meant to be an idea and not an exact blueprint. Everyone should make their own measurements. The main theme was to not drill any holes in the machine, just use the existing ones.
guy10guy11guy12